
You’re planning a rubber roofing project and need to know how long it will take. Will installers be at your property for hours, days, or longer? Can you book time off work, or will it barely affect your routine?
The answer depends on your specific roof, but rubber roofing installation is generally quicker than many homeowners expect. Most domestic projects complete in one to two days. That said, certain factors can extend timelines, and understanding these helps you plan realistically.
This guide provides honest timescales for different rubber roofing projects, explains what affects duration, and helps you understand what to expect during the installation process.
Quick Answer: Typical Installation Times
For those who want the headline figures:
| Project Type | Typical Duration |
|---|---|
| Porch or bay window | Half day to 1 day |
| Single garage | 1 day |
| Double garage | 1–2 days |
| Small extension (under 20m²) | 1–2 days |
| Medium extension (20–35m²) | 2–3 days |
| Large extension (35m²+) | 3–4 days |
| Complex or multi-area projects | 3–5 days |
These timescales assume standard conditions: sound deck, reasonable access, typical complexity, and good weather. Your project may differ.
What Happens During Each Stage
Understanding the installation stages helps explain why projects take the time they do.
Stage 1: Setup and Access (30 minutes – 1 hour)
The day begins with:
- Unloading materials and equipment
- Setting up access (ladders, platforms)
- Preparing the work area
- Brief review with the homeowner
This stage is consistent across most projects regardless of roof size.
Stage 2: Removing Existing Covering (1–4 hours)
If the old roof covering needs stripping:
- Cutting and lifting old materials
- Removing fixings
- Clearing debris
- Bagging waste for disposal
Duration depends on what’s being removed. Multiple layers of old felt take longer than a single layer. Some installations can overlay existing coverings, eliminating this stage entirely.
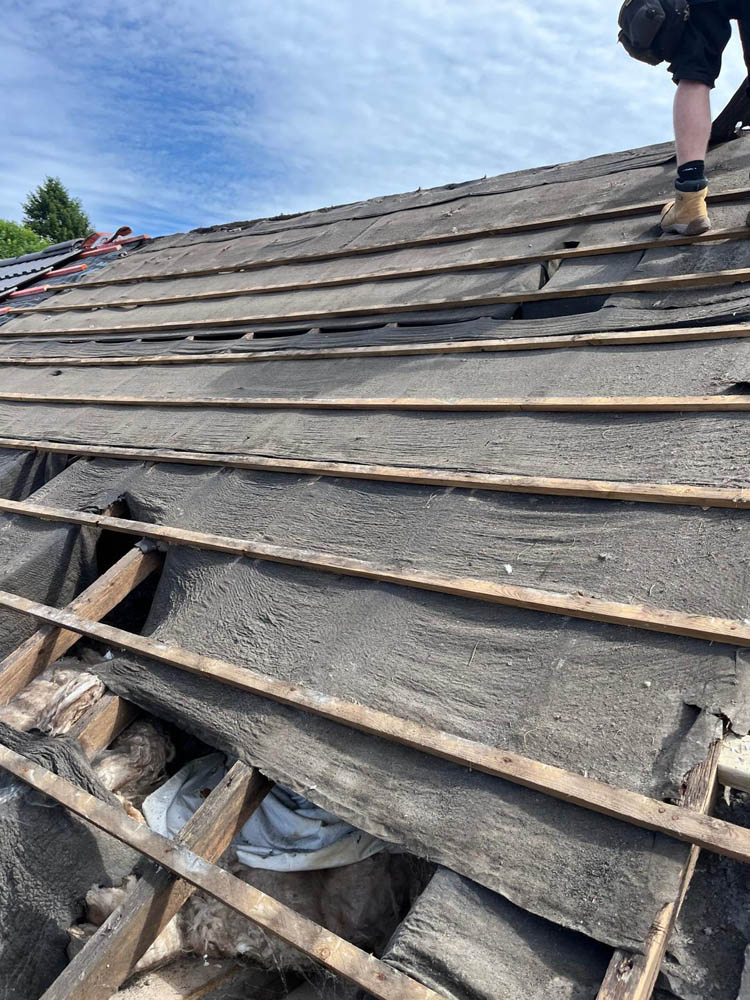
Stage 3: Deck Inspection and Repair (30 minutes – 4+ hours)
Once the deck is exposed:
- Thorough inspection for damage
- Replacing any rotten or damaged boards
- Securing loose fixings
- Preparing the surface
This stage has the most variability. A sound deck needs only brief inspection. Significant damage requiring board replacement adds hours—sometimes extending the project by a full day.
Stage 4: Installing Insulation (1–3 hours)
If insulation is being added:
- Laying rigid insulation boards
- Cutting around penetrations
- Securing boards to the deck
- Taping joints
Larger roofs naturally take longer. This stage is straightforward but must be done carefully.
Stage 5: Positioning and Bonding the Membrane (2–5 hours)
The main installation stage:
- Unrolling and positioning the EPDM membrane
- Allowing the membrane to relax
- Applying adhesive to deck and membrane
- Waiting for adhesive to become tacky
- Carefully bonding the membrane
- Rolling to ensure full contact
This stage includes mandatory waiting time for adhesive flash-off (typically 20–40 minutes per section). Larger roofs require multiple sections, extending total time.
Stage 6: Edge Details and Upstands (1–4 hours)
Finishing the installation:
- Installing drip edges and trims
- Forming upstands at walls
- Sealing corners and junctions
- Creating watertight terminations
Complex edges with multiple changes in direction take longer. Simple rectangular roofs with minimal upstands are quicker.
Stage 7: Sealing Penetrations (30 minutes – 2 hours)
For each skylight, pipe, or vent:
- Fitting appropriate collars or seals
- Bonding to the membrane
- Ensuring watertight finish
Each penetration adds time. A roof with no penetrations completes faster than one with three skylights and two vents.
Stage 8: Inspection and Cleanup (30 minutes – 1 hour)
Final activities:
- Quality inspection of all work
- Addressing any issues identified
- Clearing tools and materials
- Removing waste
- Final walkthrough with homeowner
Factors That Extend Installation Time
Several factors can push your project beyond typical timescales.
Deck Damage Requiring Repair
The biggest variable is deck condition. You can’t see what’s under your existing roof until work begins.
Minor damage (a few soft spots): Adds 1–2 hours Moderate damage (several boards needing replacement): Adds 3–4 hours Significant damage (extensive rot): Adds a full day or more
Roofs that have leaked repeatedly often have worse deck damage. If your current roof has been problematic, budget extra time for potential repairs.
Complex Roof Shapes
Simple rectangular roofs are quickest. Complexity adds time:
L-shaped roofs: Require additional corner work and edge details. Multiple levels: Each level change needs careful treatment. Unusual angles: Non-standard angles slow edge finishing. Adjoining structures: Integration with existing roofs or structures takes time.
A complex 20m² roof may take longer than a simple 30m² one.
Multiple Penetrations
Each skylight, roof lantern, vent pipe, or flue requires individual attention:
Simple pipe collar: 15–30 minutes each Skylight kerb sealing: 30–60 minutes each Large roof lantern: 1–2 hours
A roof with numerous penetrations needs proportionally more time for this detail work.
Difficult Access
How materials reach the roof affects efficiency:
Easy access (direct from driveway): Standard timescales apply Moderate difficulty (through side passage): Adds modest time for material handling Challenging access (through house, up stairs, over obstacles): Can add an hour or more
Properties in South Wales valleys often have restricted access. Terraced houses in Merthyr Tydfil, Aberdare, and similar areas may need materials carried through the property, adding time.
Weather Conditions
Rubber roofing installation requires:
- Dry conditions (no rain during adhesive application)
- Temperature above 5°C (adhesive won’t cure properly in cold)
- Reasonable wind (excessive wind makes membrane handling difficult)
Cold weather: Adhesive takes longer to flash off, extending bonding time. Marginal conditions: Installers may need to wait for improvement. Actual rain: Work stops until conditions improve.
Weather delays are unpredictable. A project scheduled for one day may extend to two if weather intervenes.
Large Roof Areas
Larger roofs simply take longer:
- More material to handle
- More adhesive to apply
- More edge details to finish
- More area to inspect
The relationship isn’t perfectly linear—setup time is fixed regardless of size—but larger projects need more installation time.
Detailed Timescales by Project Type
Let’s examine specific project types in detail.
Garage Roof Installation
Single garage (15–18m²): 1 day
Typical breakdown:
- Setup and removal: 2 hours
- Deck inspection/repair: 1 hour (assuming sound deck)
- Insulation: 1.5 hours
- Membrane bonding: 2 hours
- Edge details: 1.5 hours
- Cleanup: 30 minutes
Single garage roofs are the most common rubber roofing project. They’re straightforward for experienced installers and typically complete comfortably within one working day.
Double garage (30–36m²): 1–2 days
The larger area extends each stage. Most double garages complete in a long day or comfortable day-and-a-half. Complex shapes or significant deck repair may require two full days.
Extension Roofs
Small extension (10–20m²): 1–2 days
Similar to garage roofs in complexity but often with more penetrations (skylights, vents) and upstands (walls on multiple sides). Allow two days to be safe, though many complete in one.
Medium extension (20–35m²): 2–3 days
Larger area and typically more complex. Multiple skylights, integration with existing structures, and more extensive edge details extend the timeline. Two days is realistic; three provides contingency.
Large extension (35m²+): 3–4 days
Substantial projects requiring systematic work through multiple stages. Three days is typical; four allows for any complications.
Small Flat Roof Areas
Porch roof (3–6m²): Half day to 1 day
Small areas complete quickly once work begins. Setup and finishing take proportionally longer relative to the actual membrane area. Morning start, afternoon finish is typical.
Bay window roof (2–4m²): Half day
Often the quickest rubber roofing projects. The small area is offset by tricky access and detailed edge work, but completion in a few hours is realistic.
Dormer roof (4–8m²): Half day to 1 day
Similar to bay windows but often with more complex shapes. Access can be challenging. Allow a full day for anything but the simplest dormers.
Commercial Projects
Small commercial (50–100m²): 2–3 days Medium commercial (100–300m²): 3–5 days Large commercial (300m²+): 5+ days
Commercial projects scale up significantly but benefit from economies of scale—the larger open areas bond more efficiently than complex domestic roofs with many details.
How Weather Affects Timing
South Wales weather deserves specific attention when planning installation timing.
Ideal Conditions
The best conditions for rubber roofing installation:
- Dry (no rain for several hours before, during, and after)
- 10–20°C (warm enough for good adhesive performance, not too hot)
- Light wind (membrane handling is easier)
- Stable forecast (confidence work won’t be interrupted)
Workable Conditions
Experienced installers can work in:
- Temperatures down to 5°C (with adjusted techniques)
- Overcast but dry weather
- Moderate wind
- Between rain showers (with careful timing)
Conditions That Stop Work
Installation must pause for:
- Active rain
- Temperatures below 5°C
- Frost on the deck
- Excessively high winds
Seasonal Considerations
Spring (March–May): Variable weather. Plan for potential delays but many good installation days.
Summer (June–August): Best overall conditions. Longer days allow more flexibility. Peak demand means booking further ahead.
Autumn (September–November): Workable conditions early autumn, becoming more challenging later. Rain more frequent.
Winter (December–February): Most challenging season. Cold temperatures and wet weather cause more delays. Shorter days limit work time. However, installers are less busy, potentially offering better availability.
Planning Around Installation Time
How should you plan your schedule around the installation?
Taking Time Off Work
For most domestic projects, you don’t need to take extensive time off:
Essential: Be available at the start (30–60 minutes for access and walkthrough).
Helpful but optional: Being around during the day for any questions.
Recommended: Being available at completion for handover (30–60 minutes).
If you work from home, expect some noise disruption but typically not enough to prevent working. If you commute, you could potentially leave after the initial walkthrough and return at the end of the day.
Multiple Day Projects
For projects spanning multiple days:
Daily start time: Installers typically arrive 8–9am. Daily finish time: Usually 4–5pm, depending on stage reached. Between days: The roof will be left weatherproof. If work pauses mid-project, installers ensure temporary protection.
You don’t need to be present all day every day, but availability at the start and end of the overall project is important.
Building in Contingency
When planning around rubber roofing installation:
Add a buffer: If quoted one day, don’t schedule critical commitments for day two. Weather flexibility: If possible, have flexibility if weather delays occur. Deck repair possibility: If your existing roof has leaked, allow extra time for potential deck repairs.
How to Get an Accurate Time Estimate
Generic timescales only go so far. For your specific project:
Request Assessment During Quotation
When getting quotes for rubber roofing, ask:
- How long do you expect this installation to take?
- What factors might extend that estimate?
- How will you handle weather delays?
Good installers give realistic estimates based on your specific roof.
Provide Full Information
Help installers estimate accurately by sharing:
- The age and condition of your current roof
- Whether it has leaked and how badly
- Any access limitations
- The number of skylights or penetrations
- Any time constraints you have
Discuss Scheduling Preferences
If timing is important, discuss it:
- Do you need the project completed by a specific date?
- Are certain days better or worse for you?
- Do you have flexibility if weather intervenes?
Open communication helps installers plan your project appropriately.
What Happens If Installation Takes Longer Than Expected?
Occasionally, projects extend beyond initial estimates. Here’s what to expect:
Mid-Project Deck Damage Discovery
If significant deck damage is found:
- Installers will inform you before proceeding
- You’ll discuss options (extent of repair, cost implications)
- Timeline will be revised
- Work continues once agreed
This is the most common reason for overruns. Reputable installers explain the issue clearly and get approval before additional work.
Weather Interruptions
If weather stops work:
- The roof is made temporarily weatherproof
- Work resumes when conditions allow
- You’re kept informed of revised timing
Weather delays aren’t anyone’s fault. Flexibility on both sides resolves them.
Unforeseen Complications
Occasionally, unusual situations arise:
- Access proves more difficult than expected
- Structural issues beyond the deck
- Discovery of previous poor workmanship needing correction
Professional installers handle these situations, keeping you informed throughout.
Comparing Rubber Roofing Installation Time to Alternatives
How does EPDM installation time compare to other flat roof options?
vs Felt Roofing
Felt installation takes similar time to rubber roofing—sometimes slightly less as the material is more forgiving of technique. However, felt’s shorter lifespan means more frequent installations over time.
vs Fibreglass (GRP)
Fibreglass often takes longer than rubber roofing:
- Multiple resin coats with curing time between
- More sensitive to weather conditions
- Temperature restrictions more limiting
A fibreglass roof that might take two days could take three for GRP.
vs Liquid Applied Systems
Liquid systems can be quicker for small areas but require multiple coats with drying time. Overall, EPDM is typically comparable or faster for most domestic applications.
Summary: What to Expect
For most South Wales homeowners, rubber roofing installation is a quick, minimally disruptive process:
Most domestic projects: 1–2 days Larger or complex projects: 2–4 days Factors that extend time: Deck damage, complexity, access, weather
The installation is generally quieter and less intrusive than many home improvement projects. You don’t need to vacate your home, and disruption is limited to the immediate work area.
At M&J Roofing, we provide realistic time estimates based on your specific roof. We’ll tell you honestly how long your project should take and keep you informed if anything changes. Our installations across South Wales—from Cardiff and Swansea to the valleys—consistently meet the timescales we quote.
Ready to discuss your rubber roofing project? Contact us for a survey and quotation. We’ll assess your roof, explain what’s involved, and give you an accurate estimate of how long your installation will take.
